An indoor mini-split system relies on unobstructed airflow and clean coils to cool effectively. Dust and pet hair can cling to the filters and evaporator fins, making your unit struggle and raising energy costs. Discover how to clean your mini-split so that you can enjoy crisp, reliable air all season long.
Removing and Cleaning the Air Filters
Your mini-split relies on its filters to keep dust, pet hair, and pollen from clogging the evaporator coils. Open the front panel gently and slide out each foam or mesh filter with a steady hand. Place them in a sink filled with warm water and a mild detergent. Submerge the filters and swirl them around so the soap reaches every strand of the mesh. After about five minutes, rinse each filter under a gentle stream until the water runs clear.
Give them a gentle shake to remove excess water, then set them upright on a towel to air dry. Make sure the filters feel completely dry before reinstalling. Wet filters can trap moisture and invite mold growth, which strains your unit and spoils the air you breathe. When the filters appear bright and debris-free, slide them back into place, listening for the click that confirms they are seated correctly.
Sprucing Up the Evaporator Coils
The evaporator coils live just behind those filters, and they collect fine dust that can reduce airflow and cooling capacity. With the panel open, look at the fins and brush away loose particles with a soft coil-fin comb or a clean paintbrush. For stubborn build-up, a foaming coil cleaner works wonders. Spray the cleaner evenly across each coil surface, letting the foam latch onto grime.
After the contact time specified on the bottle, rinse the loose residue with a spray bottle of plain water. Keep the nozzle gentle to avoid bending the delicate fins. If you spot any dents or crushed fins, run the comb gently through those areas to straighten them. Clean coils let refrigerant absorb heat more effectively to allow your system to reach your target temperature faster and with less effort.
Clearing the Drain Line and Condensate Pan
Moisture that drips from the coils collects in a small pan before exiting through a drain line. Over months of cooling, algae and sludge can build up and block that exit path. To clear it, locate the drain connection on the side of the indoor unit or behind the blower housing.
Place a small bucket underneath and use a wet-dry vacuum to suck out any blockages. If you prefer a chemical approach, pour a mixture of one part vinegar and four parts water down the drain, letting it sit for 10 minutes before flushing with plain water. Once the line runs clear, inspect the condensate pan itself. If you see trapped water, remove it with a cloth or turkey baster. A dry pan prevents overflow leaks that could damage flooring or drywall below your indoor unit.
Wiping Down the Case and Fan Blades
Dust and fingerprints on the unit’s plastic casing look unsightly and may harbor grime that drips over time. Use a soft microfiber cloth dampened with water and a drop of mild detergent to wipe the exterior surfaces. Open the flap to expose the fan blades and gently wipe each blade edge to remove accumulated dust. Rotate the blades by hand to access every section. Avoid spraying cleaner directly onto internal parts. A clean housing not only looks better but also helps you notice any hairline cracks or discoloration that could signal UV damage. Give special attention to the air discharge grille. Clogged slats can scatter the airflow unevenly, leaving some parts of the room chill and others lukewarm.
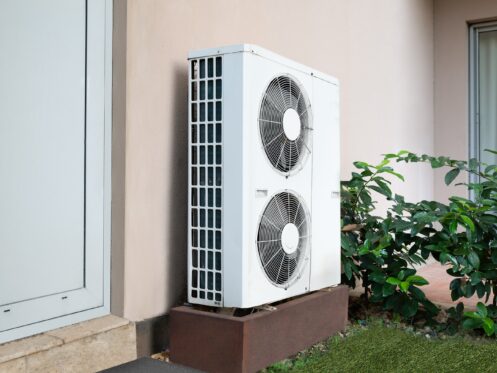
Inspecting the Outdoor Condenser Unit
The outdoor condenser handles heat rejection, and its health is just as important as the indoor portion. Have a certified technician remove the safety grille and check the fan motor, blades, and condenser coils. Over time, outdoor coils gather pollen, dirt, and small debris that restrict airflow and make your mini-split struggle. A trained pro uses a coil-cleaning solution designed for exterior units and then rinses it off with low-pressure water to wash away clogs without bending the fins. They’ll also verify that the fan spins freely, tightening any loose mounting bolts and lubricating motor bearings if needed.
Electrical connections at the condenser can loosen from vibration, so an electrician will torque down the terminals and test the voltage at the contactor. Finally, a quick measurement of the condenser’s operating pressures confirms that refrigerant levels match factory specifications. All of these steps require specialized tools and knowledge of refrigerant handling regulations, so entrusting this work to certified technicians avoids costly damage or code violations.
Performance Monitoring and System Calibration
After cleaning and mechanical checks, your mini-split benefits from a system-wide calibration. A service professional hooks up gauges and airflow meters to confirm that supply air temperature and delivery volume hit your comfort targets. They’ll adjust the electronic expansion valve, if equipped, to fine-tune refrigerant flow for peak efficiency at different load conditions.
A calibrated control board keeps the thermostat and remote communicating accurately, preventing short cycles or overshoot in heating and cooling. The technician logs key metrics, such as superheat and subcooling values, into a service report, giving you a benchmark to compare against at future visits. That record lets you spot gradual declines in performance before they become breakdowns. When you combine detailed performance checks with clean coils, clear drains, and tight electrical connections, your mini-split operates like new.
Seasonal Maintenance and When to Call a Pro
Although you can handle filter cleaning and light coil care yourself, plan on a professional tune-up every winter and summer. Technicians perform detailed tasks like testing motor draw, measuring airflow velocity, and calibrating the control board. They also replace worn belts or bearings that can cause noisy operation or sudden failure.
If you notice unusual noises, like squealing or grinding, schedule that service right away. Having a professional inspect refrigerant lines with electronic leak detectors adds another layer of protection against invisible gas loss. A seasonal tune-up catches small wear issues before they force you to endure warm, muggy nights or unexpectedly high electric bills.
Extending Your System’s Life With Care
Regular attention to your ductless mini-split keeps it running like new for years. Clean filters and coils, clear the drain path, and keep the housing pristine, and you help the system face heavy daily load cycles without strain. A well-maintained mini-split responds faster to cooling calls, draws less power, and avoids the breakdowns that leave you reaching for fans on hot afternoons. Our service membership makes it easy to keep up.
Your Next Steps for Clean Air Running Through Your Ducts
Regular mini-split cleaning keeps your air fresh and your unit humming quietly. Along with a careful wipe-down and filter swap, Monkey Wrench Plumbing, Heating, Air & Electric offers refrigerant checks, condensate-line clearing, and annual system tune-ups to round out your maintenance routine. Want to lock in peak performance? Call Monkey Wrench Plumbing, Heating, Air & Electric in Los Angeles today to schedule your next mini-split service.